B2: Creative Industry Response
-NOTE: Blogger occasionally doesn't save properly and so i end up losing progress because the versions don't update.
Info on party video games
What is a party video game?
Party video games are commonly designed as a collection of simple minigames, designed to be intuitive and easy to control, and allow for competition between many players. Some, like the Mario Party series and Sonic Shuffle, are played on simulated gameboards.
Some are modelled on the TV game show format, offering points for teams who can answer questions the fastest. Trivia-type games might have questions posed from the stage and each table-top writing their answers to be collected and scored. Others may take on some of the qualities of Open Space environments and allow participants to wander in a less structured way.
What are the three biggest party video games?
1. Mario Party games
2. Jackbox games
3. Among us
What is the main appeal for these games?
For those people who don't have the time to sit at a screen for hours at a time or simply don't want to, party video games are the ideal alternative. They don't require too much brain power, and you don't have to be particularly skilled at gaming to play, which is what makes them so appealing to such a huge audience.
How do you make them fun and engaging?
Games in the party genre rely on the intrinsic value of humour, surprise, and creativity, and offer very simple rule sets with limited value of points. They should be simple, increase variety for players, and make it easily shareable. Have fun!
Are they meant for little to large groups of people?
Party video games are multiplayer games designed for social gatherings, offering simple mechanics and a light-hearted atmosphere. They are accessible to players of all skill levels, encourage social interaction, and come in a variety of types to cater to different tastes. These games create shared experiences, strengthen relationships, and are adaptable to various group sizes, making them ideal for duos or groups looking to have fun and bond together. Using this, I will make a game with easy mechanics and easy enough for those trying it out. -----------------------------------------------------------------------------------------------------------------------------
Research on party video games
Some party games I enjoy personally are: any of the Jackbox games (specifically 2, 5 and 8), WarioWare games (specifically minigame mania, smooth moves and DIY) and also I enjoy Super Mario Party. These games all involve playing (micro)games within the main game, completing challenges to get to the top and get the prize using your total points. These games really help bring people together and split them apart (in game).
https://www.youtube.com/watch?v=y9BKCVx_mNk - All Super Mario Party minigames
https://www.youtube.com/watch?v=43GR5oGFT9c - All WarioWare Smooth Moves minigames
https://www.youtube.com/watch?v=I90EQaQp_iY - A review for Jackbox Party Pack 2
-----------------------------------------------------------------------------------------------------------------------------
https://www.youtube.com/watch?v=y9BKCVx_mNk - All Super Mario Party minigames
https://www.youtube.com/watch?v=43GR5oGFT9c - All WarioWare Smooth Moves minigames
https://www.youtube.com/watch?v=I90EQaQp_iY - A review for Jackbox Party Pack 2
https://youtu.be/PKABiPK4oLw?si=pJavElgaT013sN8E - An overview of 9-volts levels in WaioWare Get It Together
https://youtu.be/vFmNv2w2m_o?feature=shared - WarioWare Inc Microgames
-----------------------------------------------------------------------------------------------------------------------------
The GDD for the personal party game


 The plan for the GDD was for a basic game, now many weeks in, we plan on adding more game modes so this game mode will come with its own GDD.
-----------------------------------------------------------------------------------------------------------------------------
-----------------------------------------------------------------------------------------------------------------------------
Development of the personal party game
Development began with everyone in the class coming up with ideas for party games. People voted for the party games they would want to be involved in and so after a while I got here now working with a team to design this game.
Here is the idea concepted into a quick summary paragraph:
1-4 LAN or split-screen based Players will race and fight their way through the dungeons, solving multiple puzzles and or choosing to trap their “teammates” using secret levers and or leaving them behind. Traps will be multiple styles: Skyrim spinning match symbol puzzle, key to the correct door, repetition puzzle, levers in order and falling platforms – if a puzzle is wrong, player will take damage at location where final switch/toggle is used. Enemies will be there to stop players, and there will be a final boss at the end so if a player is solo and has refused to help other players, the fight will be harder. Levels should be in a straight line on a fixed camera following a line, camera can zoom and show when a player reaches a new room/wins. – design will be medieval sewer themes and shall feature enemies (skeletons) to stop players in their tracks - Theme will be medieval and realistic in the design, following real images and concepts. Upon finishing the matching puzzle, it will reset for the other players (if chosen to by the player who has finished). Players CANNOT hurt one another – only enemies and enemies will be locked to certain areas.
Moodboards:


Some of images are from pre-existing titles such as Diablo III and some is concept art such as For Honor. I use an old mood board (from my isometric game) as it features similar things that I would want in my game.
Level concept:
The level was to be one whole stretch of road containing 4 sections for each player. Players can choose to go into a room together and wok with a team or they can go solo along a single path and try their hand at the puzzles themselves.


The play board will just be a starting point, i do plan on expanding the map further with zip lines and alternative routes.
Camera opening sequence

The game will feature an opening cinematic.Camera opening sequence
-----------------------------------------------------------------------------------------------------------------------------
Programming
This issue is caused by the new Enhanced Input system brought in to replace the old simple and easy to use input action mappings. Another thing that is broke is the "Skip assigning player 1 controller" tab in which means player 1 (0 ID) will not use the controller and it will be given to player 2 (1 ID) but this is bugged to which player 1 will get the controller no matter what. Unreal Engine comes with a lot of issues. An issue that has been present since 5.1 dropped is that local multiplayer (split screen coop using 1 mouse and keyboard and or with an additional controller) no longer works.
To counter this, I made a system that will bypass the skipping feature - This comes with its own issue being that I now need 2x controllers.

 This code works by first getting all the spawn points in the game and setting those as the number of players, after this, it will set a unique input for either player, one would be using controller, the other controller or keyboard and mouse.
 This is the custom GameMode i made especially for this feature.
It will start by getting the number of players and will set unique ID for them all (excluding player 0). The array index (IDs) will them be linked to either controller input or Mouse and Keyboard. This mapping context is set to the new Enhanced Input System developed to replace the standard Action Mappings.
Next, This code will spawn and de-spawn players based on if they leave or join via a button click (in this case the Start button or P key). This works by creating the player and setting the array mentioned above.
The IntPawn is an empty pawn that will be possessed upon loading the game so players will have to manually load in.
Here is the custom player controller I made for spawning in the characters and de-spawning them.
It will start by getting the number of players and will set unique ID for them all (excluding player 0). The array index (IDs) will them be linked to either controller input or Mouse and Keyboard. This mapping context is set to the new Enhanced Input System developed to replace the standard Action Mappings.
Next, This code will spawn and de-spawn players based on if they leave or join via a button click (in this case the Start button or P key). This works by creating the player and setting the array mentioned above.
The IntPawn is an empty pawn that will be possessed upon loading the game so players will have to manually load in.

------------------------------------------
Player Setup
Player Setup
Next, I edited the player to have a light that will be used to light the area the player is navigating in.

The pieces are made of 3 separate items: Rope, Lantern and Light.

The rope is connected to the pelvis bone within the character skeleton so it will move with the hip giving it an effect of realism.


The pieces are made of 3 separate items: Rope, Lantern and Light.
The rope is connected to the pelvis bone within the character skeleton so it will move with the hip giving it an effect of realism.
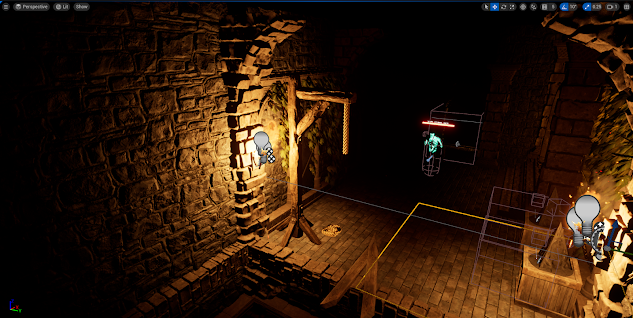
Here is the light setup. the light will flicker like a real fire lantern would.
 |
| Each player has a unique character -if we have time at the end, I may add a select screen, but for now each player will be given a character. |
------------------------------------------
Interact Widget

Setting up movement.
 |
| The widget has 3 parts, the text telling the player what to do, the button (that looks like a key) and a text box within the button. |

------------------------------------------
Camera setup
The first draft shows the player's camera being set at a tilt facing down, this was achieved easily. So, I decided to make an advanced first person camera too (Mainly for Online Multi-Player via steam).
 The camera flip system is as simple as it looks, a flip flop will be activated when V is pressed, meaning it will flip between both lines of code.
 The camera will check if the boolean (is it in the first person mode) is active and if so will allow the pawn to be controlled via the mouse to look around. It will also set the pitch and yaw to be that of a certain amount. This all links to the bones within the character skeleton that will track and display in game.
Also the boolean is a custom effect that will allow the player to use a mouse if they are in first person and if not, their pitch and yaw will be at 0 so they cannot look up or down, thus the third person camera is used.
 The bone modifiers will connect to each spine, neck and head piece and will transfer the camera movement to the correct pieces.

Also the boolean is a custom effect that will allow the player to use a mouse if they are in first person and if not, their pitch and yaw will be at 0 so they cannot look up or down, thus the third person camera is used.
Here it is in effect, switching from third to first to third.
THE CAMERA HAS CHANGED DUE TO THE BONES BEING EDITED TO FIX AN ISSUE WHERE THE NECK WAS CLIPPING:
Updated camera movement.


--------------------------------
Stamina:
Stamina will refill every second (based on a tick with a delay) up until its full.


When players run out of stamina, they will be vulnerable to attack by the enemy.
This video shows the player losing stamina when attacking.
---------------------------------
Attacking - Damage:
The players are given a unique task to tell the blueprint they can do an attack again - if not, it will wait until it is called.
The code for the attacking is done simple first and then expanded on:
The first line of blueprint is for checking if the player can attack (using the animation blueprint) and then playing an animation for the list (in order), this'll delay and then reset the combo after all attacks in the list are done.
---------------------------
Timer:


-------------------------------------------------------------------------------------------------------------------
Traps/Puzzles
Traps/Puzzles
The first trap is the falling floor trap, this was made very simple:
 | ||
| It will destroy the actor (being the tile) if the player steps on it. Here is the Tiles being used: --------------------------------------- The next trap that was created was the hanging swords used to be a trap for those who try to race ahead. If a player runs into the trap, they'll take damage, but if they were to walk into it, they'll take non.   The cable is set up for swinging and twisting like a real hanging blade would do.  The code will damage the player if they hit the sword (this is edited so that it will depend of the force). The other part will set it to swing when the game starts. Here is a video of the hanging swords in action. This video shows both the swinging and dammageing parts of this trap.--------------------------------------- Swinging sword trap The plan is to create a trap that will swing one way and then the other way.  The sword will have a box which will deal damage to the player if they are hit.
 The trap will start a custom event which will cause it to swing via a timeline every tick of the game. At the start, it will set the trap 90 degrees. --------------------------------------- Podiums Next is the Podiums that will be the first major puzzle.    The second line of blueprint is for the collision box so the widget can activate when the player is close (using the custom BPI). The line on the top right is for setting up the locks. This is done by checking if the box is over the other box, if it enters the box, it will remove a lock needed and if it leaves/is not in the box, it will add a lock needed. The bottom line is for setting up the rotation when it is interacted with. It will rotate automatically at the start by getting the start rotation and setting it to rotate wither 120 degrees or 240 degrees.    Here is the podium resetting and opening the door. |
Lever operated doors
The doors are all operated via a switch (or two).
 |
| I made a separate lever stick, this is so I can set a rotate point for easier animating. |
 |
| Here is a custom BPI (Interface) for setting up the interaction system. |
 |
| This will cast to each player, making sure they can all interact. |
 |
| The lever is made of 3 main pieces: Box collision for setting up the widget (interact) and for checking if the player is in range, the lever and the lever box. |
 |
| OUTDATED - The lever will open the door via the unlock bpi and a get actor reference. This will cause the animation for the door to play. Firstly, it will check if the player is in range of the lever and will allow input to be done. After this, it will check if the door is actually closed. If it is closed, it will open it and if it is open, it will close (this is done in the reverse lever (see image below). 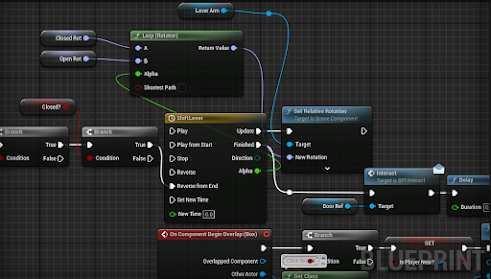 |
 |
| The door will open when the BPI Event is called (the lever is used). |
UI rotation:

--------------------------------
Notes:

I thought of an idea to add notes to help players. The notes will provide a small amount of help, enough to help them to go in the correct location.

I found a note png online and imported it.

I then turned this into an emissive material so i can add it to a plane.

Here is how it looks on the table.

Here is an example of a note used for the beginning starting room.

And here is an overview of the note blueprint.

The Blueprint for the note is simple:
The top line is for the whole interaction element which will check if a player is close enough and if so,it will display the widget.
The bottom line is for the box collision for enabling the inputs of players and setting if they're close or not - boolean.
Here is a video of the notes working in game.
------------------------------
Sword Pieces Puzzle:


The code for player 1 simply checks if the correct player has walked over the piece, and if so, it will add it to that players pool.
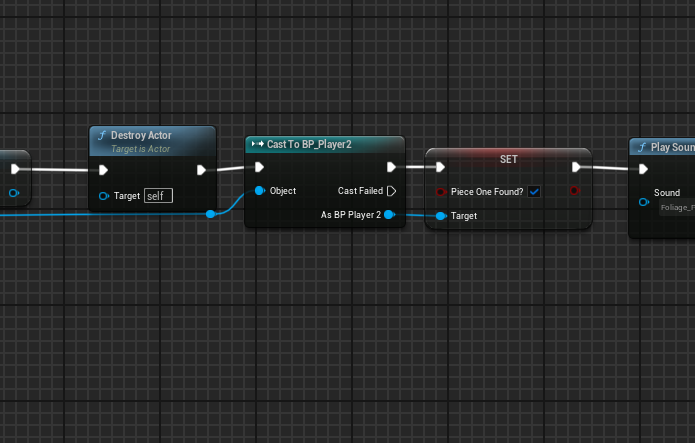

Piece number 2 - guard.The code for player 2 is the same, but with it checking if player 2 walked over the item.


Piece number 3 - blade.

Once again, the code is identical.

A look at the full sword that gets placed into the podium.


The code first gets the original start point of the door in the map, after that it will check which ever player is near and will display a widget if they haven't gotten every piece yet. If they have, it will communicate with the podium and will open if the sword has been placed.

A video showcasing all the pieces and what happens if you dont find them all and if you do.
SFX for finding all pieces.
------------------------------------------------------------------------------------------
AI Enemies:

Ai will be undead, for this I used the Skeleton Model from the "Undead Pack".

In the animation blueprint, the notify for the "can attack again notfiy" will set the attacking boolean to false - letting the enemy attack again.

I set up the controls for the attacking for both controller and keyboard.

The code for the attacking is done simple first and then expanded on:
The first line of blueprint is for checking if the player can attack (using the animation blueprint) and then playing an animation for the list (in order), this'll delay and then reset the combo after all attacks in the list are done.

The notify to call a function in characters to detect if they have been hit.

Death animations did not have a loop section so I had to improvise using a loop within the death animation.

The updated look of the enemies.


Adding a box for the enemies that will activate when swinging.
 |
| The top line of blueprint is for playing a hit animation (if a player or enemy is hit) this will also check if a plyer is dead or not. The second line is for the death event that will disable all movement and play the death animation and then will destroy the actor after a while. |

The attack event for the for enemy is different as it will have to call an event due to it not being controlled by a player.


Here is the set up for the enemy animation that will play the hit notify for the player it hit and will make it be to swing again.

The Hit detection will cast to each individual player depending on who is hit.

The blackboard for the enemy will first get the location of each player and will detect who is closer, it will then move to that payer and then finally attack.


Setting up an event for getting hit and attacking:

The top line of blueprint is for when an enemy take damage, they will play an animation of getting hit and then if they take too much (hp less than or equal to 0) it will play the death event.
The bottom line of blueprint is for when an enemy attacks, it will play either of the attacking animations which links to the whole behaviour tree.

The UI is simple, a HP bar and name.

The enemy will be given a unique name and set of armour when they spawn.
 The widget UI for the enemy will firstly, set its health to full.
 Then it will update if it is hit or not.
 The function that is called is for setting the health.

In the widget, it will set the health to divide by 100 - 1.0

The code for setting unique names will chose a name from a list and set that text.
 An in game look at the unqiue names.
The bottom line of blueprint is for when an enemy attacks, it will play either of the attacking animations which links to the whole behaviour tree.
The UI is simple, a HP bar and name.
The enemy will be given a unique name and set of armour when they spawn.
In the widget, it will set the health to divide by 100 - 1.0
The code for setting unique names will chose a name from a list and set that text.


Only if the player is within a certain range (in this case, the collision box), can the enemy attack.
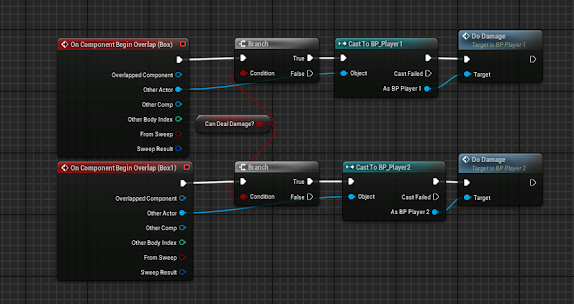
Also, the enemy can only deal damage if the player is within a certain range, in this picture, the collision box is attached to the sword, so if the enemy attacks and the player is within range, it can deal damage.


The Ui working
Bug fix:
Showing the fix in action.
-----------------------------------------
Boss:
I wanted an AI enemy that would be there to hold a key for the player to grab, SO i quickly added more meshes to a duplicated enemy AI.

Added cloth, Box, Shield, Bandages.

They're taller than the standard enemy.

Enemy AI will move around the highlighted area using nav meshes.

The setting of the unique Boss names.
The boss also has a unique BT.

This code will first see if the enemy is classed as a "Main Boss" and if so, it will apply its meshes and if not, then it will remove them.


-----------------------------------------
Weeping Angels:

Every tick, it will check if the enemy has been rendered, if not, it will move towards the players, and if it is, it will stay still and not do anything.

I started with a basic enemy which I then shrunk down and attached a mesh to.

The mesh was one of the angels from the paragon packs.

This blueprint will then find the location and then move the enemy to whoever is closer.
----------------------------------------------------------------------------------------
Potions:
The plan for potions was that when the player starts, they will have 2x potions available and that when they were depleted, that was it, so I thought I should add more around the map to find.

An overview of the potions in game.

The blueprint for the potion starts with the widget:
The top line of blueprint is for displaying the widget as invisible when its been collected, then it will call an event in the overlapped players code to update the number of potions available.
The bottom line of blueprint enables the input of players and will show the widget and hide it depending on if the player is in the collision box.


For now, the health potion is simple, it heals the player for 25hp.
And when they use he H key, they are ejected with an additional 30hp but this stops once the two starting potions are gone.


A look at the new healing in game.
New health potions: Players cannot use health potions if their health is 90+. Also players can only carry 5 potions max, to save some for others (this will be brought down when more players are added).
UI for the potions:
A UI for when player collects too many potions, they will be stopped and the UI will appear.New health potions: Players cannot use health potions if their health is 90+. Also players can only carry 5 potions max, to save some for others (this will be brought down when more players are added).
UI for the potions:
------------------------
Emotes:


the emote mechanic is super simple, when the button is pressed, it will play a random emote from the list.
---------------------------------
Help menu:


------------------------
Fall Damage:

A large fall will take 50% of your HP.
A small to medium fall will take 10% to 30% of your HP.
------------------------
Final Coffin Lid Seal Puzzle.:
 The pieces are all set invisible until they have been collected.

The pieces are all different.

The code is the same as the sword pieces, once overlapping, it will destroy and add the piece to the inventory of the plyer.
 Adding camera shake when all pieces are found.
 The code for this is the same as the sword puzzle except the added code of the players individual pick up contribution as seen above.
 Again, the code is simple. It will run a check every tick to see if all the pieces have been picked up.
The puzzle pieces will be added with each piece found and once complete, a magical lock will be added, completing the final puzzle allowing the treasury door to open.
 In this picture, the code is checking if either player 1 or 2 have collected a piece, and if so, it will add it to the list of collected pieces.
Updated UI and VFX.
Players can work together to solve the puzzle.
SFX for collecting all pieces.
------------------------
SFX:
If not listed already, the SFX updates will be put here:
 All emotes, attacks and hurt animations were given sound effects (all of which were ran through a random select so they are unique).
Fall damage SFX.
------------------------
Final Coffin Lid Seal Puzzle.:
The pieces are all different.
The code is the same as the sword pieces, once overlapping, it will destroy and add the piece to the inventory of the plyer.
The puzzle pieces will be added with each piece found and once complete, a magical lock will be added, completing the final puzzle allowing the treasury door to open.
Updated UI and VFX.
SFX for collecting all pieces.
SFX:
If not listed already, the SFX updates will be put here:
Healing SFX.
sItem pickup SFX.
--------------------------------
Level SFX:


-----------------------------------------------------------------------------------------------------------------------------

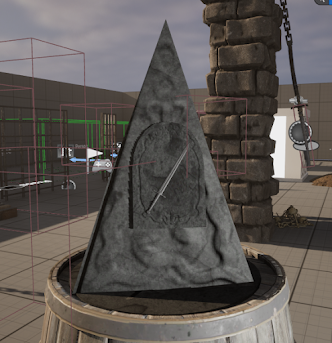
Jamie's 3D Models added to game.
Jamie is the 3D modeller for our group and had provided me the models for the Totem seen in the programming section.

Along with this, He created custom textures for me to use:

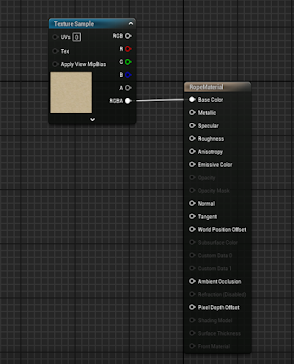
I quickly added these to the game, first assembling the model and then creating custom materials for each totem:
Along with this, He created custom textures for me to use:

 |
| Here is the two textures Jamie made. |
 |
| Here is the base model (pyramid) material I made using the texture and a mud (free starter asset) texture and combined the two using a grayscale effect. |
 |
| Here is the Material I made for the Headstone using the same mud texture as a base and applying Jamie's texture on top: |
 |
| Here is how the texture turned out. |
 |
Finally, I created the Item material, This is more metallic and dark. |

Here is the Final overview of the Totem with a light to give an emissive feel.
------------------------------
Axe:

A look at what the axes look like in game.

The sword modelled by Jamie is rendered in Blender.

Here it is within UE5 with the material I made.
 The custom material for the sword.
--------------------------
Hiltless Blade:
A blender overview of the sword made by Jamie.
 Jamie made a replacement for the hanging blades, This is how it looks within UE5.
 The material.
 The blades connected to the hanging ropes.
A video showing the physics and look of the sword in game.
---------
Ropes:

The Blender render.
the material.

An in game overview.
----------------
Chain:

The Blender render.

The material.

A quick look of the chain in game.

An example of the chain being used in game.
 Another example of the chain being used in game.
-------------
Spear and weapons rack:

The render in blender made by jamie.

The model in gamne.
------------
Furniture:

The render by Jamie.
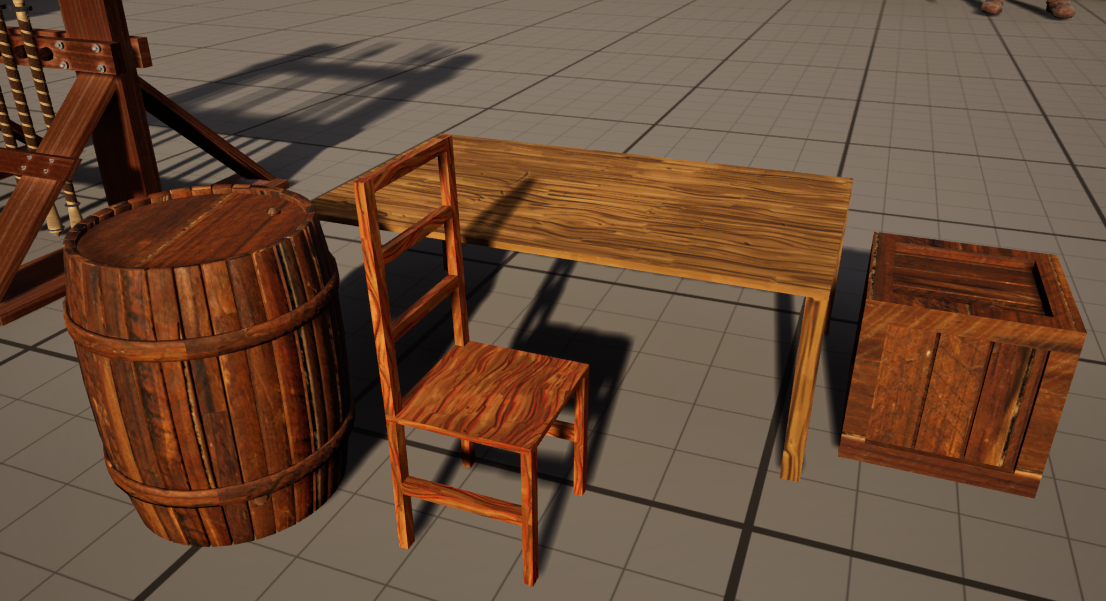 The models in game.
-----------------------------------------------------------------------------------------------------------------------------
------------------------------
Axe:
 |
| Jamie created an Axe in blender for use in the swing trap. |
 |
| He found textures online to use in this project, the textures are to be modified and made darker to fit the old dungeon theme. |
 |
| The mesh was too big, I had to make a separate blueprint with all the pieces together. |
 |
| After adding them all together, the axe was ready to be textured and scaled down. |
 |
| The material for the wrap of the handle. |
 |
The material for the Blade. |
 |
| I added these to the swords. |
 |
| And changed the collision boxes to only be over the blade. |
 |
| An overview of the Axe, fully finished. |
A look at what the axes look like in game.
A video demonstration of the axes.
-------------------------
Sword:
Sword:
The sword modelled by Jamie is rendered in Blender.
Here it is within UE5 with the material I made.
--------------------------
Hiltless Blade:
A blender overview of the sword made by Jamie.
A video showing the physics and look of the sword in game.
---------
Ropes:
The Blender render.
the material.
An in game overview.
----------------
Chain:
The Blender render.
The material.
A quick look of the chain in game.
An example of the chain being used in game.
-------------
Spear and weapons rack:
The render in blender made by jamie.
The model in gamne.
------------
Furniture:
The render by Jamie.
Level design
The level has changed overall from the concept but still follows the same idea. The level will be one big long path with alternative routes and obstacles.
From what I know, level design in party games prioritizes accessibility, social interaction, replayability, balanced difficulty, variety, creativity, and iterative improvement based on player feedback. By incorporating these principles, designers can create engaging and replayable experiences that can work with players of all ages and skill levels.
Setting up the lighting for the level.
------------------------------
Starter Room:
From what I know, level design in party games prioritizes accessibility, social interaction, replayability, balanced difficulty, variety, creativity, and iterative improvement based on player feedback. By incorporating these principles, designers can create engaging and replayable experiences that can work with players of all ages and skill levels.
Setting up the lighting for the level.

------------------------------
Starter Room:
The level started with the starting room. The idea for this room was for the players to be able to gear up and have time to prepare for the game to start. The room should be big enough for all players to walk around and should have easy access to the first line of traps.
 |
| Here is a concept image (unknown author) that I liked and adapted into our game. |
 |
| I began constructing the starting room based on that image. |
 |
| Shelf was made using different wood pieces. |
 |
| A view from the top down camera. |
The First Trap:
 |
| The hallway came next, this would transition into the main dungeon. |
 |
| An outside view of the hallway. |
 |
| I added stone roof pieces so the camera would have an isometric style when the camera would pass by the bounds of the level. |
 |
| The first trap has been placed. |
 |
| The first rooms are close to completion. |
 |
| Finished room outside. |
 |
| Finished room from the inside. |
 |
| New trap variant has been placed down. It will be much harder to tell where to go. |
------------------------------
The bridge:
Once the players have got across the traps, they will be met with a bridge. Upon this bridge players will encounter their first set of enemies (their health should be lower due to it coming first). The bridge has access from both sides connecting two rooms and should merge to the main tomb area.
 |
| A bridge will link the min dungeon to the start. I also created a balcony to make it less boring. |
 |
| The balcony will be hard to see from the camera view so detail is not needed badly. |
 |
| The steps to the tombs will lead to the main puzzle room. |
 |
| Added more detail to the bridge. |
 |
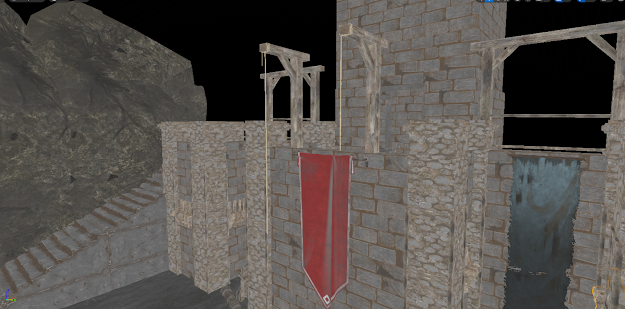
| Rocks, lighting and banners have been added. |
 |
| Adding props to the bridge now. |
 |
| First trap room got an overhaul too. |
 |
| The steps got props added and will be the next room for the first puzzle. |
 |
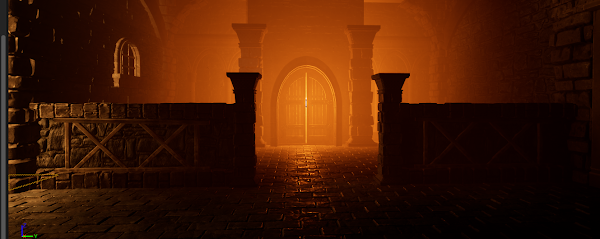
| Added a roof to the bridge, this will help sell the effect of being deep below. Lighting and fog has been changed also to give it a hot, foggy look. |
------------------------------
The first puzzle room:
After getting through the doors, the players will encounter their first major puzzle. The puzzle will consist of 3x spinning matching puzzles. The room will have 2 side rooms, each holding a sign for the puzzle and the final will be on the back wall by the mausoleum. The room should be big enough that all players can walk around at once.
 |
| Here is a concept I liked to use as a base for the first puzzle room. |
 |
| It started as a rectangle. |
 |
| Edited a little water output. |
 |
| Added detail and props. |
 |
| I found more concept art from another unknown source. |
 |
| I began to build the stage, using would pieces and lantern posts. |
 |
| Checking the scaling. |
 |
| I began to work on the other side too, making a sort of shrine. |
 I began to finalize the area adding the mausoleum walls. | ||
|

 |
| I began to fill the interior with props. |
 |
| The stage was then prop-ified. |
 |
| The shrine also got decorated. |
 |
| An over headshot - pre makeover. |
 |
| I began to add more props and life into the area. |

 |
| An some down below too. |
 |
| Adding dirt and debris. |
 |
| Adding rocks and stone along the paths to either block off holes or to add some life. |
 |
| Adding foliage. |
 |
| I began to add uniqueness to the coffin slots. |
 |
| An overhead shot of the scene filled with foliage. |
 |
| And now with the lights sorted. |
 |
| First Person shot 1 |
 |
| First Person shot 2 |
 |
| First Person shot 3 |
 |
| First Person shot 4 |
 |
| First Person shot 5 |
 |
| Mausoleum shot. |
 |
| A look with the scene unlit. |
 |
| mausoleum shot 2 |
 |
| Stage shot |
 |
| Shrine shot |
 |
| Podium shot |
 |
| I began to create the hallways for the next trap part. |
 |
| Right hallway shot |
 |
| Left hallway shot |
 |
| Left hallway from the gate. |
 |
| Right hallway from the gate. |
 |
| A shot of the whole area. |
Side Rooms:
The side rooms will be where the players can find certain symbols for the spinning puzzles, the rooms should be big but not too big. This should allow for multiple players to walk into and view the symbols.
 |
| Adding more detail - door to the back of the mausoleum. |
 |
| The other door to the back of the mausoleum. |
 |
| I created the side rooms to have the symbols. |
 |
| The shelf is made of wood pieces just like the stage. |
 |
| Right would be alternative storage. |
 |
| Both of these rooms would be storage rooms, the left room would be more fitting of this. |
 |
| The shines are in place. |
 |
| This may help the player explore other areas too. ------------------------------- The alternative rooms for the hallways: |
Torture Room:
 |
| Found a picture online (unknown artist) and saw it used similar items that I had, so I thought i would try to base a room on said picture. |
 |
| It began with a cube, setting up the basic parameter for the room. |
 |
| Next, I set up the lights for the room. |
 |
I then started to decorate.  Adding barriers so players cannot leave the map. |
 |
| I tried to make the light coming through the window be the point of attention for light sources. Making it the main light source. ---------------------- Storage Room:  I began by crafting some shelves.    Adding lighting with fog.       |
--------------------------------
The next hallways:
The next set of hallways will be where the next few harder traps can be found e.g. swinging blades, boss fight for a key, etc. The rooms connected will be there to confuse players and maybe give them the thought to search (currently have no use, but may be used in the future). The hallways should be 2x both big enough for multiple players to run through. The hallways will lead to the swinging traps.
The next set of hallways will be where the next few harder traps can be found e.g. swinging blades, boss fight for a key, etc. The rooms connected will be there to confuse players and maybe give them the thought to search (currently have no use, but may be used in the future). The hallways should be 2x both big enough for multiple players to run through. The hallways will lead to the swinging traps.
 |
| I quickly sketched a plan for how I wanted this trap room to go. |
 |
| I then put that concept into a room. |
Adding doors so the downstairs doors do connect.


Decorating the bridges.

Adding deny walls so players cannot jump out of the map.


-------------------------------
The first piece room:
This room will have multiple doors, some closed, some open. Scattered around, players will find multiple pieces for the sword key to unlock the door to the next trap. The room should be big, allowing all players to freely roam and should include multiple rooms/exits for hiding pieces.


After this, i began to add walls and trims.


Th next area will be where a trap door is held.

Adding the sword podium for players to interact with when all pieces have been found.


--------------------------
Trap door room:
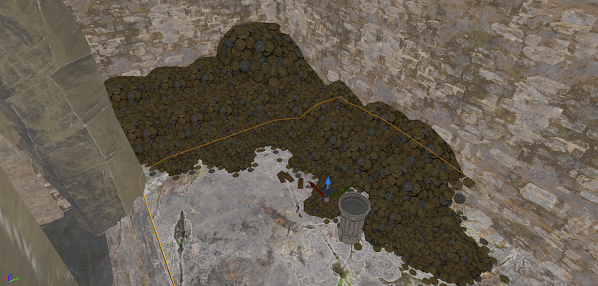
This room will be a straight hallway, a little room telling the player they're approaching the end, It should hold gold and other trinkets but will also have a major trap door in the middle of the room. at first, it'll look like it locked, but as a player steps on it, it will open, either making players fall into the cave system below or allowing players to see that its a trap and allow them to walk around it.
The cave itself will be smallish, housing the easter egg room and a small guard foundation building maybe with some gallows.


Testing the angle.


Adding props.


Adding them to the top.


---------------------
The wooden beam trap:
The last big trap room will be the wooden beam walking plank room A largish room with a few wooden beams leading the final room. A 10 foot drop waits below and will be holding enemies. The player must cross the wooden beams with knocking them over (example is in fallout 4's Nuka World DLC). This room will also be where the stairs from the cave drop will lead to, allowing players to advance no matter if they fell or not.


I started by adding a hallways which will split into the stairs for below the gallows ( the gallows leas to the next room, no matter if you fall down the trap or not).


The next area is the major room for the wooden plank trap.

Adding a few props.


Adding a room for the key to sit in, unlocked y a spinning puzzle trap.

A 2 spin trap puzzle is included to open the door.
A 2 spin trap puzzle is included to open the door.

The icons can be found on the wall behind it.
--------------------------------
Final Tomb:
The plan for this room was for it to feel like a tomb, a final place for a King. His own room. The style should be like a church or a crypt. The rooms around it will hold the riches and items from the King and will have a secret cave entrance as seen in the original concept image for the map.


It started with the entrance way, I wanted to stay away from the boxy look.


adding extra details.


Creating the stairs for the upper level of the back room.


The starting of the vault


water and SFX.
------------------------
Shop

--------------------------------------------------------------------
Camera Shake:


The camera shake just literally shakes the players camera, depending where they are.

The shake in effect.
The shake updated.
-------
Gameplay Video:
HERE IS A 10 MIN VIDEO OF GAMEPLAY - AUDIO CUTS OUT FOR SOME REASON WHICH LOSES A LOT OF THE GAMES FEEL.
------------------------------
End screen:

The win screen UI.


Here is a video showing the end screen.
--------------------------------
Main Menu:
Main Menu:
 |
| The main menu is set up so the camera will face an empty black screen and then switch to the view of the characters on the select screen. The events will do this via the buttons in the widgets. |
 |
| Every player has an invisible tag on them that will only show when in the character select screen. |
 |
| Setting up a custom font from the website. |
 |
| Setting up the font. |
https://www.1001fonts.com/fantasy-fonts.html - link to the website for the font.
 |
| Setting up the UI for the menu. Simple and clean. |
 |
| Player selection widget. |
 |
| The player select screen. |

A quick look at the players lined up.


----------------------------------
Armoury:

Starting by creating half a room (as thats all that will be visible).


Adding puddle decals to the floor.


------------------------------------
Animations - Cutscenes:
https://yagmanx.medium.com/unreal-engine-5-cinematics-sequencer-101-triggering-gameplay-fa0ec38221ec - useful site I found for setting up cutscenes.


Adding all sequence video for the rooms.

Here is the code for creating the rockfall, it will spawn rocks, drop them and then destroy them once out of sight.

The video sequences so far.
UPDATED SEQUENCE:

Here is the code used to freezing the player whilst the cutscene plays, and for creating a spotlight to see the objects easier.
UPDATED SEQUENCE:
Extra sequences:
Rocks falling and voice lines.
----------------------------------
LODs Setup:
https://www.youtube.com/watch?v=NqotFqrRWeo&t - This video explains LODs and shows the perfect way to set them up.

Too add: Video of LOD show off.
---------------------------------
Voice lines
Unreal comes with a feature that allows creators to add lines for when a character speak, I found this a bit boring, so I added UI animation and different player colours.


A video showing the voice lines working.
------------------------------------------------------------------------------------------------------
Game Review:
In my personal opinion I am satisfied with the game I have made, I rarely play party games, so this project really challenged me to take something I know little about and try to make it unique.
We did multiple playtests, each with their ways of improvement. For one of these play tests, Jamie wrote a detailed paragraph on what needs improving:
First playtest: 22nd March notes

With this, I took the time to make improvements featured in the feedback, such as:
- Blocking,
- Unique rooms and side areas,
- Better lighting to guide players,
- For cutscenes, visual dialogue was also added to help the player understand,
- Items such as potions and the puzzle pieces are now glowing,
- Glowing notes for the player to read to see what needs to be done,
- AI was made to be able to attack from a longer distance, rather than being an inch from the players face.
- Camera was made more dynamic, to help the player feel like they have room to breathe.
Here is the finalised gameplay video showcasing all the changes that were made:
----------
Second playtest: 10 May notes
Yet to receive feedback.
------------------------------------------------------------------------------------------------------
--------------------------------------------------------------------------------------------------------------------------
Battle Mode - Secondary Game Mode:
Game Review:
In my personal opinion I am satisfied with the game I have made, I rarely play party games, so this project really challenged me to take something I know little about and try to make it unique.
We did multiple playtests, each with their ways of improvement. For one of these play tests, Jamie wrote a detailed paragraph on what needs improving:
First playtest: 22nd March notes
With this, I took the time to make improvements featured in the feedback, such as:
- Blocking,
- Unique rooms and side areas,
- Better lighting to guide players,
- For cutscenes, visual dialogue was also added to help the player understand,
- Items such as potions and the puzzle pieces are now glowing,
- Glowing notes for the player to read to see what needs to be done,
- AI was made to be able to attack from a longer distance, rather than being an inch from the players face.
- Camera was made more dynamic, to help the player feel like they have room to breathe.
Here is the finalised gameplay video showcasing all the changes that were made:
----------
Second playtest: 10 May notes
Yet to receive feedback.
------------------------------------------------------------------------------------------------------
--------------------------------------------------------------------------------------------------------------------------
Battle Mode - Secondary Game Mode:
In this game mode, plays will stuck in a top down camera, fighting endless waves of skeletons and ghouls. The main inspiration for this game would be Dead Ops Arcade (a side game mode in CoD Black Ops Games).
I got the idea after seeing a few images online, I liked how they were top down as it reminded me of the top down shooters i had played before. I got the idea and decided to make it fit the game.
----------------------
Programming:
 The gamemode is almost the same as the dungeon one, it will spawn a player when a button is pressed.
 Again, using the code from the other gamemode and the new lines will spawn/despawn players and set enemies up in spawners so they can spawn without exceding the number set.
 The spawn player code is the same as the dungeon code, spawning player based on how many spawn points are set in game.
-------
Spawners:

This function simply gets all spawners and makes it the main target.

This code spawns enemies depending on if all enemies are dead and a new wave has started.

This code gets the queue (how many enemies are required per round) and spawns them in via the spawners in game.
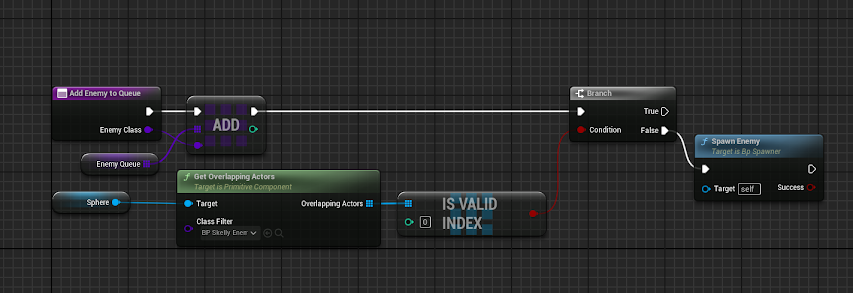 This code adds enemies to the que upon checking the list for how many should spawn.
 Here is a quick look at how the spawner looks.
-----------
Drops:

Here is the code used to spawn the potions and then turn them invisible for a brief time when a player uses it.

A look at the potions itself, it will spin and have vfx.
------------
Players:

Here is the look at the new camera added for the top down portion of the game.
 Here is the camera for triggering when the game starts.
 healing is done in a similar way to the potions in the dungeon game, but it will only heal when a player walks over a potion drop.
 This code spawns and temporarily hides and makes the potion unusable when a player walks over it.
-------------
Gamemode:

 This code sets how many enemies should spawn per round. Once a round reaches 5, from then on it'll spawn a random amount of enemies .
 This code starts the wave, spawning in the right amount of enemies.
 This code simpily ends the round.
 When this code is called, the loading screen is played, allowing players a bit of time to heal and gather items.

This code checks how many enemies the round needs and spawns them depending on the allowed limit, so if 9 enemies need to spawn, it may spawn 5 first and then spawn 4 after so players aren't overwhelmed.
 This code gets the pool and adds or removes the round from the list.
 This code adds 1 round to the number and adds the number of enemies left in the round.
 This code adds enemies when the number of enemies are shortened by players killing them, meaning it'll spawn how ever many are left to spawn per round.

This code gets the data from the structure table (round number and enemies per round
) and then adds that to the enemy pool list.
A video showing the new wave in progress UI.
---------
UI
 The new round beginning animation wont play until the transition code is called.
 This code changes the number of round and enemies left when certain functions are called.
 A look at the players health and stamina UI.
---------------------
Level Design

A cool concept image by Djekspek
 Redesigned the gatehouse and outerwalls.
 Getting the outline sorted.
 Adding walkways.
 Adding details to the walk ways and walls.
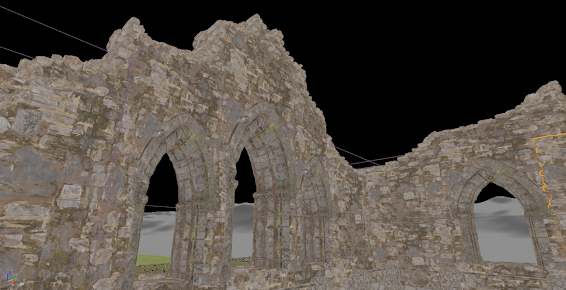
 The destroyed chapel was next.
 Adding flooring.
 Blocking gates.
 Walk ways done with floors and details.
 Rocks and river are done next.
 Adding blocking volumes to stop players jumping out.

 Front of castle view.
 Side view from river.
 Adding grass overflow.
 Top view with room layouts.
 Adding props kitbashed from many pieces.
 Adding wooden details for innerwall structure and canopy.
 Adding dirt path.
 All dirty layered out.
 Adding dirt overflow on floors and doorways.

A look at the dirt. Another view.
 Adding stones and bricks.
 Keep floor laid out.
 Adding broken roofing.

Overview of finished product.
 Adding lighting.
 A look at the view.
 Adding fog.
 AI jump points from their spawn.
 Another from the high walls.
 Chapel catwalk and stage.
 Stairs and details.
 Adding broken walls so players and AI can jump down.
 Finished product.
 Adding broken pieces to the windows so they arent boxy and are more realistic.
----------
Gameplay Video:
;
I got the idea after seeing a few images online, I liked how they were top down as it reminded me of the top down shooters i had played before. I got the idea and decided to make it fit the game.
----------------------
Programming:
-------
Spawners:
This function simply gets all spawners and makes it the main target.
This code spawns enemies depending on if all enemies are dead and a new wave has started.
This code gets the queue (how many enemies are required per round) and spawns them in via the spawners in game.
-----------
Drops:
Here is the code used to spawn the potions and then turn them invisible for a brief time when a player uses it.
A look at the potions itself, it will spin and have vfx.
------------
Players:
Here is the look at the new camera added for the top down portion of the game.
-------------
Gamemode:
this structure creates the pool for the enemies (who should spawn and when).
This code checks how many enemies the round needs and spawns them depending on the allowed limit, so if 9 enemies need to spawn, it may spawn 5 first and then spawn 4 after so players aren't overwhelmed.
This code gets the data from the structure table (round number and enemies per round
) and then adds that to the enemy pool list.
A video showing the new wave in progress UI.
---------
UI
---------------------
Level Design
A cool concept image by Djekspek

Finishing back walls and staircase.
A look at the dirt.
Overview of finished product.
----------
Gameplay Video:
;
----------------------------------
Render shots:


The starting room

The first trap


The first trap.

The bridge

The cave entrance to the crypt

The entrance


Shrine.

Mausoleum


The torture chamber


The armoury.
Packs used asset-wise:
Infinity Blade Props

Paragon Gideon, Greystone, Kwang and Serath


Undead Pack

Medieval Dungeon

Fantasy Bundle Environment

Infinity Blade Props
Paragon Gideon, Greystone, Kwang and Serath
Undead Pack
Medieval Dungeon
Fantasy Bundle Environment
-----------------------------------------------------------------------------------------------------------------------------
Scrum Sheets:


TRELLO:

Me and Jamie used teams and discord to communicate ideas and feedback. Raven was unfortunately ill for most of this project, so they never really tuned in to what was happening.


------------------------------------------------------------------------------------------------------
Final thoughts:
I really felt I had challenge here, trying to create a unique party style game. I think I've managed to do it, but who knows, the expo is next.
Jamie has been one of the most useful people ever, his work has made our game better visually and gameplay wise.
Raven's ideas were also helpful and their artwork was quite impressive, shame they were ill for most of this project, but I appreciate them both as teammates so much this project.
This course has been my most favourite and I have enjoyed every moment and met so many wonderful people and had the most helpful of lecturers. I wish this cvourse was a year longer so I could enjopy it even more. Each project has been a good challenge to test us all and i will be taking everything i have learned into my future.
Note to Dan: Thank you for being such an amazing lecturer throughout this course and providing many tips and caring so much about your class.
Thank You!
-----------------------------------------------------------------------------------------
Last edited 10/05/2024 - 23:55
Last edited 10/05/2024 - 23:55

Comments
Post a Comment